
Introduction
This post will expand on the work previously done in Securing API Gateway with Lambda@Edge as we will have an API Gateway that needs to be exposed for public consumption, but do not wish for it to be abused. In this case, we are using our Lambda function to send an email that captures information from a form on our site.
We'll cover:
- Setting up Microsoft Graph API for email sending
- Creating a Lambda function with Secrets Manager integration and Microsoft Graph API
- Building a reusable contact form component for our Vite React site
Overview
flowchart LR
    User((User))
    Admin((Admin))
    CF[CloudFront<br/>Distribution]
    S3[(S3 Bucket)]
    APIG[API Gateway]
    Lambda[Lambda<br/>Function]
    Azure[Azure Client<br/>Apps]
    AzureID[Azure Identity]
    Email[Send.Mail]

    User --> CF
    CF --> S3
    User --> APIG
    APIG --> Lambda
    Lambda --> Azure
    Azure --> AzureID
    Azure --> Email
    Email --> Admin

    style CF fill:#8C4FFF,color:#fff
    style APIG fill:#8C4FFF,color:#fff
    style S3 fill:#569A31,color:#fff
    style Lambda fill:#FF9900,color:#fff
    style Azure fill:#0078D4,color:#fff
    style AzureID fill:#0078D4,color:#fff
This is slightly simplified from the previous post but should use the pattern outlined in the previous post. We have a Cloudfront Distribution that is used to serve our static site. We have a Lambda function that is used to send an email. We have an API Gateway that is used to expose the Lambda function to the public. See our other post for more details about how to secure this API Gateway and Lambda.
Microsoft Graph Setup
Before we can send an email, we need to setup a Microsoft Graph API. This assumes you have an Azure account and are an admin with access to create apps and register them and an email account to send the email from.
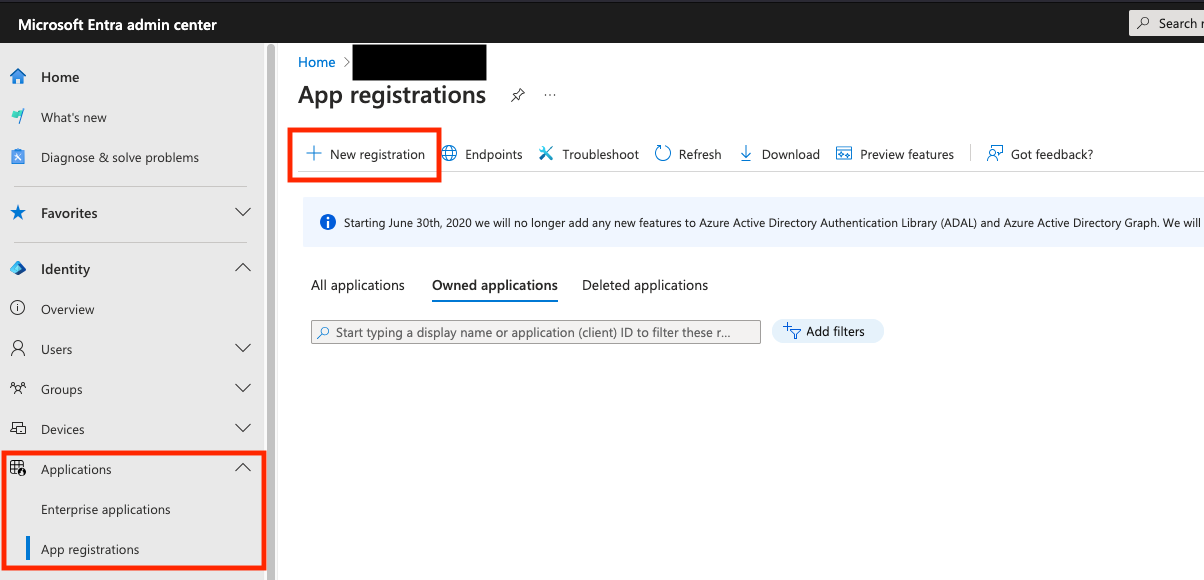
- Go to Azure Portal
- Navigate to "Identity"
- Click on "App Registrations"
- Click on "New Registration"
- Fill out the form and click on "Register"
- Name: "Email Sender App"
- Accounts in this organizational directory only
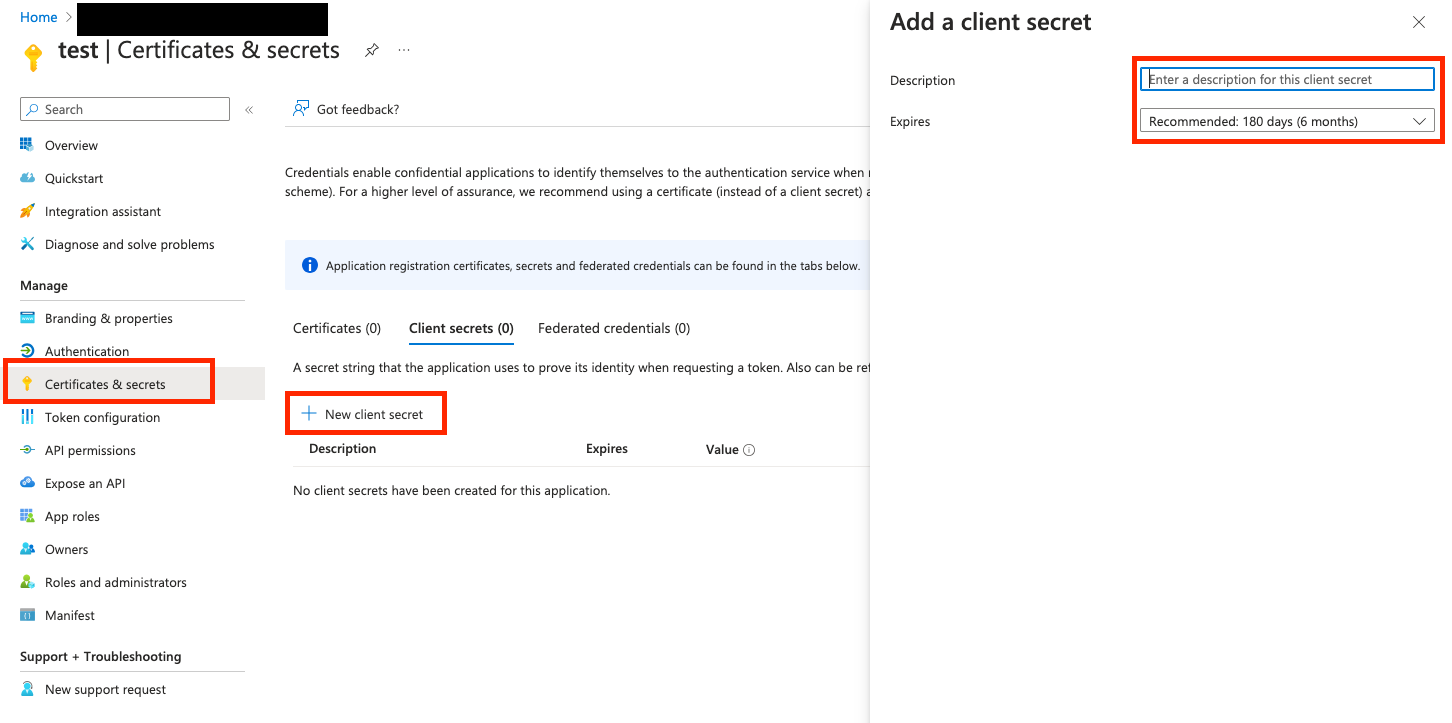
- Once registered, click on "Certificates & Secrets"
- Click on "New Client Secret"
- Fill out the form and click on "Add"
- Copy the Client Secret (make sure to save the secret somewhere at this time; this is the only time it will be available)
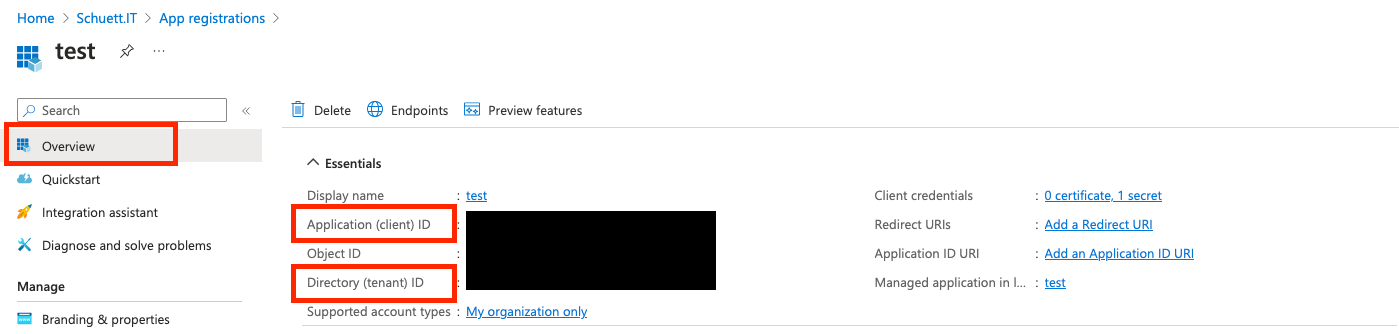
- Navigate back to Overview
- Capture the Tenant ID and Client ID
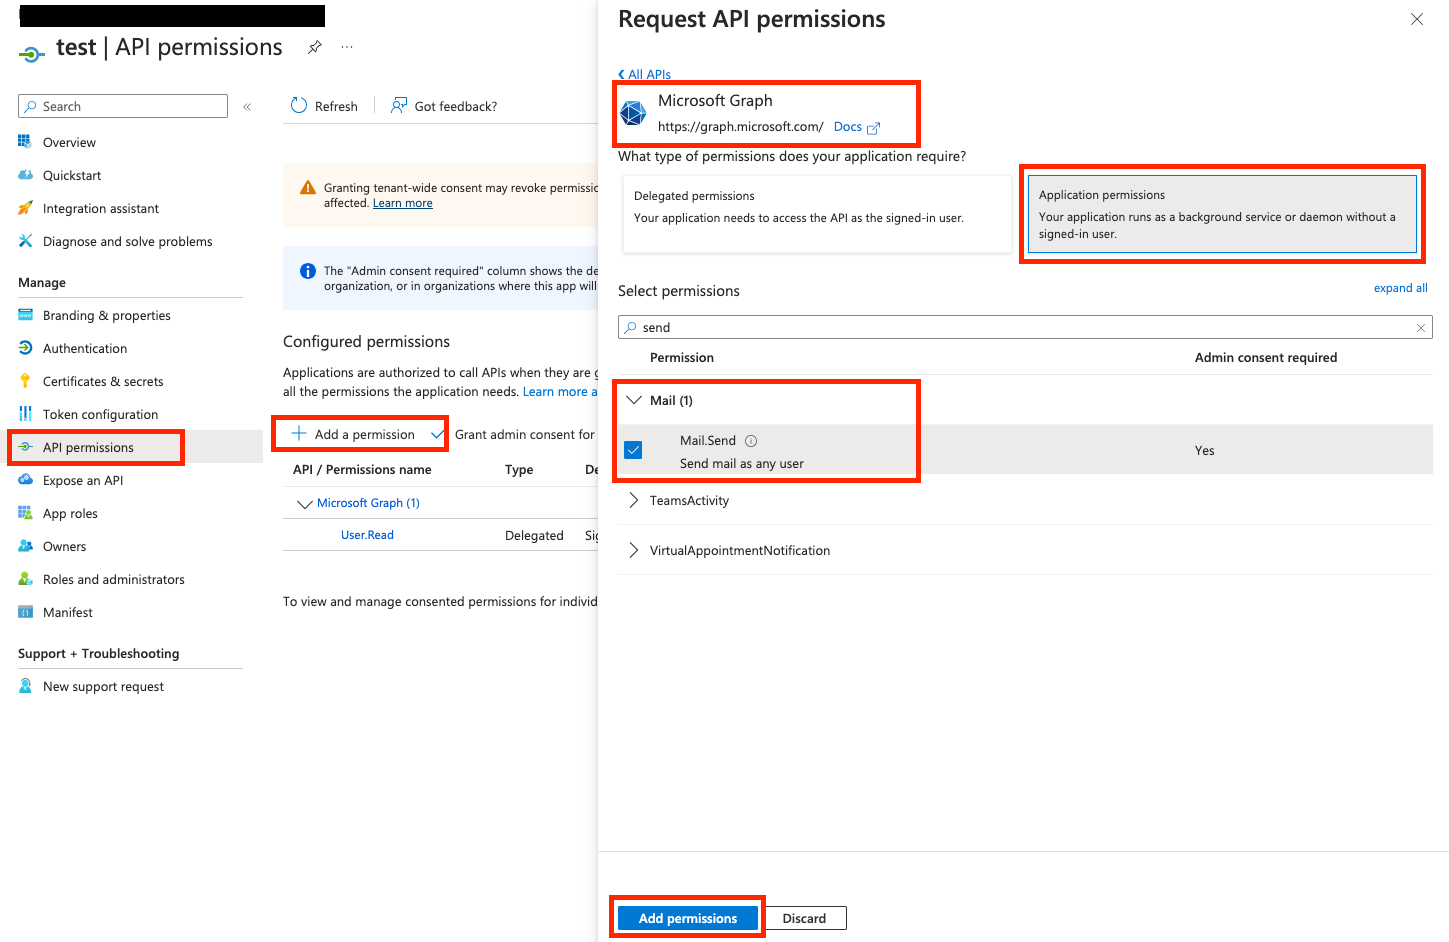
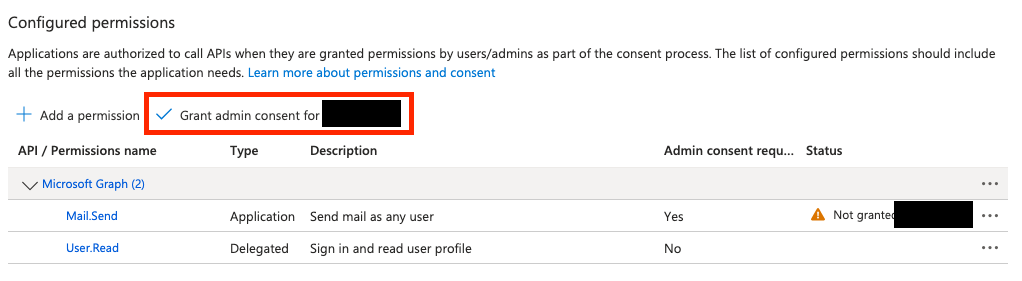
- Configure the API Permissions
- Click 'Add a permission'
- Click 'Microsoft Graph'
- Select 'Application Permissions'
- Add the following permissions:
- Mail.Send
- Click on "Add permissions"
- Click on "Grant Admin Consent"
Lambda Function
Now that we have the Microsoft Graph API setup, we can create the Lambda function.
import { APIGatewayProxyEvent, APIGatewayProxyResult } from "aws-lambda";
import { Client } from "@microsoft/microsoft-graph-client";
import { ClientSecretCredential } from "@azure/identity";
import {
  SecretsManagerClient,
  GetSecretValueCommand,
} from "@aws-sdk/client-secrets-manager";

interface FormData {
  name: string;
  email: string;
  phone: string;
  subject: string;
  message: string;
}

interface MicrosoftGraphSecrets {
  clientSecret: string;
  tenantId: string;
  clientId: string;
}

// Initialize AWS Secrets Manager client
const secretsManager = new SecretsManagerClient({
  region: process.env.AWS_REGION,
});

// Function to get secrets from AWS Secrets Manager
const getSecrets = async (): Promise<MicrosoftGraphSecrets> => {
  const command = new GetSecretValueCommand({
    SecretId: process.env.MICROSOFT_GRAPH_SECRET_NAME!,
  });

  try {
    const response = await secretsManager.send(command);
    if (!response.SecretString) {
      throw new Error("Secret string is empty");
    }
    return JSON.parse(response.SecretString);
  } catch (error) {
    console.error("Error retrieving secrets:", error);
    throw new Error("Failed to retrieve secrets from Secrets Manager");
  }
};

// Initialize Microsoft Graph client
const initializeGraphClient = async () => {
  const secrets = await getSecrets();

  const credential = new ClientSecretCredential(
    secrets.tenantId,
    secrets.clientId,
    secrets.clientSecret,
  );

  return Client.initWithMiddleware({
    authProvider: {
      getAccessToken: async () => {
        const token = await credential.getToken([
          "https://graph.microsoft.com/.default",
        ]);
        return token.token;
      },
    },
  });
};

const validateFormData = (data: any): data is FormData => {
  return (
    typeof data.name === "string" &&
    typeof data.email === "string" &&
    typeof data.phone === "string" &&
    typeof data.subject === "string" &&
    typeof data.message === "string"
  );
};

const sendEmails = async (formData: FormData) => {
  const businessEmail = process.env.RECIPIENT_EMAIL!;
  const senderEmail = process.env.SENDER_EMAIL!;

  // Initialize the Graph client with secrets
  const graphClient = await initializeGraphClient();

  // Send confirmation email to submitter
  await graphClient.api("/users/" + senderEmail + "/sendMail").post({
    message: {
      subject: `Form Submission Confirmation: ${formData.subject}`,
      body: {
        contentType: "HTML",
        content: `
          <h2>Thank you for your submission!</h2>
          <p>Dear ${formData.name},</p>
          <p>We have received your form submission and will review it shortly. Here's what you submitted:</p>
          <ul>
            <li><strong>Subject:</strong> ${formData.subject}</li>
            <li><strong>Message:</strong> ${formData.message}</li>
          </ul>
          <p>We will contact you soon regarding your submission.</p>
          <p>Best regards</p>
        `,
      },
      from: {
        emailAddress: {
          address: senderEmail,
        },
      },
      toRecipients: [
        {
          emailAddress: {
            address: formData.email,
          },
        },
      ],
      replyTo: [
        {
          emailAddress: {
            address: businessEmail,
          },
        },
      ],
    },
    saveToSentItems: true,
  });

  // Send notification email to business
  await graphClient.api("/users/" + senderEmail + "/sendMail").post({
    message: {
      subject: `New Form Submission - ${formData.subject}`,
      body: {
        contentType: "HTML",
        content: `
          <h2>New Form Submission Received</h2>
          <h3>Submitter Details:</h3>
          <ul>
            <li><strong>Name:</strong> ${formData.name}</li>
            <li><strong>Email:</strong> ${formData.email}</li>
            <li><strong>Phone:</strong> ${formData.phone}</li>
            <li><strong>Subject:</strong> ${formData.subject}</li>
          </ul>
          <h3>Message:</h3>
          <p>${formData.message}</p>
        `,
      },
      from: {
        emailAddress: {
          address: senderEmail,
        },
      },
      toRecipients: [
        {
          emailAddress: {
            address: businessEmail,
          },
        },
      ],
      replyTo: [
        {
          emailAddress: {
            address: formData.email,
          },
        },
      ],
    },
    saveToSentItems: true,
  });
};

export const handler = async (
  event: APIGatewayProxyEvent,
): Promise<APIGatewayProxyResult> => {
  // Set CORS headers
  const headers = {
    "Access-Control-Allow-Origin": process.env.ALLOWED_ORIGIN || "*",
    "Access-Control-Allow-Headers": "Content-Type",
    "Access-Control-Allow-Methods": "POST, OPTIONS",
  };

  // Handle preflight requests
  if (event.httpMethod === "OPTIONS") {
    return {
      statusCode: 200,
      headers,
      body: "",
    };
  }

  try {
    if (event.httpMethod !== "POST") {
      return {
        statusCode: 405,
        headers,
        body: JSON.stringify({ message: "Method not allowed" }),
      };
    }

    const body = JSON.parse(event.body || "{}");

    if (!validateFormData(body)) {
      return {
        statusCode: 400,
        headers,
        body: JSON.stringify({ message: "Invalid form data" }),
      };
    }

    await sendEmails(body);

    return {
      statusCode: 202,
      headers,
      body: JSON.stringify({ message: "Form submitted successfully" }),
    };
  } catch (error) {
    console.error("Error processing submission:", error);
    return {
      statusCode: 500,
      headers,
      body: JSON.stringify({ message: "Error processing submission" }),
    };
  }
};
Secrets Manager Setup
Before deploying the Lambda function, you'll need to:
- Create a secret in AWS Secrets Manager with the following structure:
{
  "clientSecret": "your-client-secret",
  "tenantId": "your-tenant-id",
  "clientId": "your-client-id"
}
- Make sure your Lambda function has the necessary IAM permissions to access Secrets Manager:
{
  "Version": "2012-10-17",
  "Statement": [
    {
      "Effect": "Allow",
      "Action": ["secretsmanager:GetSecretValue"],
      "Resource": "arn:aws:secretsmanager:${AWS::Region}:${AWS::AccountId}:secret:${SecretName}"
    }
  ]
}
This Lambda will send two emails: one to the person submitting the form and one to the RECIPIENT_EMAIL. These emails will be sent from SENDER_EMAIL. RECIPIENT_EMAIL and SENDER_EMAIL can be the same. The RECIPIENT_EMAIL is the email address that will receive the notification email. The person submitting the form will receive a confirmation email.
Lambda Function Environment Variables
MICROSOFT_GRAPH_SECRET_NAME: The name/ARN of your secret in Secrets ManagerRECIPIENT_EMAIL: The email address to receive notificationsSENDER_EMAIL: The email address to send fromALLOWED_ORIGIN: The allowed origin for CORS (optional)
Frontend Integration
The frontend component is designed to work seamlessly with our Lambda function. Here are the key integration points:
import React, { useState } from 'react';
import { Button } from '../ui/button';
import { Input } from '../ui/input';
import { Label } from '../ui/label';
import { Textarea } from '../ui/textarea';
import {
  Dialog,
  DialogContent,
  DialogDescription,
  DialogHeader,
  DialogTitle,
} from '../ui/dialog';

// Get the base URL for API calls
const getApiUrl = () => {
  if (import.meta.env.DEV) {
    return '/api/contact'; // This will be proxied in development
  }
  return process.env.NEXT_PUBLIC_API_URL || '/api/contact'; // Production URL
};

interface FormData {
  name: string;
  email: string;
  phone: string;
  subject: string;
  message: string;
}

interface ContactFormProps {
  title?: string;
  description?: string;
  buttonText?: string;
}

export function ContactForm({
  title = 'Contact Form',
  description = 'Fill out this form to send us a message.',
  buttonText = 'Send Message',
}: ContactFormProps) {
  const [formStatus, setFormStatus] = useState<'idle' | 'submitting' | 'error'>(
    'idle',
  );
  const [errorMessage, setErrorMessage] = useState<string>('');
  const [showConfirmation, setShowConfirmation] = useState(false);

  const handleSubmit = async (e: React.FormEvent<HTMLFormElement>) => {
    e.preventDefault();
    setFormStatus('submitting');
    setErrorMessage('');

    const form = e.currentTarget;
    const formData = new FormData(form);

    const contactData: FormData = {
      name: formData.get('name') as string,
      email: formData.get('email') as string,
      phone: formData.get('phone') as string,
      subject: formData.get('subject') as string,
      message: formData.get('message') as string,
    };

    try {
      const response = await fetch(getApiUrl(), {
        method: 'POST',
        headers: {
          'Content-Type': 'application/json',
        },
        body: JSON.stringify(contactData),
      });

      if (!response.ok) {
        const errorData = await response.json();
        throw new Error(errorData.message || 'Failed to submit form');
      }

      // Show confirmation dialog
      setShowConfirmation(true);
      // Reset form
      form.reset();
    } catch (error) {
      console.error('Error submitting form:', error);
      setFormStatus('error');
      setErrorMessage(
        'There was an error submitting your message. Please try again or contact us directly.',
      );
    } finally {
      setFormStatus('idle');
    }
  };

  return (
    <>
      <div className='w-full max-w-md mx-auto'>
        <div className='text-center mb-6'>
          <h3 className='text-2xl font-semibold text-primary mb-2'>{title}</h3>
          <p className='text-gray-600'>{description}</p>
        </div>

        <form onSubmit={handleSubmit} className='space-y-4'>
          <div>
            <Label htmlFor='name' className='block mb-1'>
              Name
            </Label>
            <Input
              type='text'
              id='name'
              name='name'
              required
              className='w-full'
              placeholder='Your name'
            />
          </div>

          <div>
            <Label htmlFor='email' className='block mb-1'>
              Email
            </Label>
            <Input
              type='email'
              id='email'
              name='email'
              required
              className='w-full'
              placeholder='your@email.com'
            />
          </div>

          <div>
            <Label htmlFor='phone' className='block mb-1'>
              Phone Number
            </Label>
            <Input
              type='tel'
              id='phone'
              name='phone'
              className='w-full'
              placeholder='(555) 555-5555'
            />
          </div>

          <div>
            <Label htmlFor='subject' className='block mb-1'>
              Subject
            </Label>
            <Input
              type='text'
              id='subject'
              name='subject'
              required
              className='w-full'
              placeholder='Subject of your message'
            />
          </div>

          <div>
            <Label htmlFor='message' className='block mb-1'>
              Message
            </Label>
            <Textarea
              id='message'
              name='message'
              required
              className='w-full min-h-[100px]'
              placeholder='Your message...'
            />
          </div>

          <Button
            type='submit'
            className='w-full'
            disabled={formStatus === 'submitting'}
          >
            {formStatus === 'submitting' ? 'Sending...' : buttonText}
          </Button>

          {formStatus === 'error' && (
            <div className='text-red-500 text-sm mt-2'>{errorMessage}</div>
          )}
        </form>
      </div>

      <Dialog open={showConfirmation} onOpenChange={setShowConfirmation}>
        <DialogContent>
          <DialogHeader>
            <DialogTitle>Message Received</DialogTitle>
            <DialogDescription className='pt-4 space-y-3'>
              <p>
                Thank you for your message! We have received your
                submission and will review it shortly.
              </p>
              <p>
                We will get back to you as soon as possible.
              </p>
            </DialogDescription>
          </DialogHeader>
        </DialogContent>
      </Dialog>
    </>
  );
}

export default ContactForm;
Conclusion
In this post, we've built a secure and scalable solution for sending emails using Microsoft Graph API from AWS Lambda. The solution includes:
- Secure credential management using AWS Secrets Manager
- A reusable React form component
This pattern can be adapted for various use cases beyond contact forms, such as notification systems, automated reports, or any scenario requiring secure email sending capabilities from serverless functions.